A Tutorial in Xdialog
- What is a Dialog?
- Using the <;<; Delimiter
- Standard Controls
- Controlling the Layout of Controls
- More on Controlling the Layout of Dialogs
- Special Formatting for Text Box Controls
- Introduction to Dialog Box Events
- Working with Images on Dialogs
- More Dialog Box Controls
- Adding Help To a Dialog Box
- The Record List Control
- Working with Pointer Arrays
- Tree Controls
- Advanced Buttons
- Using Owner-Draw Specifications in Controls
- Using Embedded Owner-Draw Specifications in Controls
- Modeless Dialog Boxes
- Embedded Dialog Boxes
- Miscellaneous Examples
- ADO Examples
- ActiveX Examples
- Graphing
- Other
- HTML
- Property Sheets
Description
A dialog, or dialog box, is used throughout Windows programs to interact with the user. A dialog can be used to gather information from the user, or to present information to users. Xdialog is an extremely powerful and flexible language for describing a standard Windows dialog box. In fact, testament to the power and flexibility of Xdialog is the fact that much of what's new in Alpha Anywhere is written using Xdialog.
What is a Dialog?
Xdialog allows you to create dialog boxes that contain all standard Windows controls, such as text boxes, combo boxes, list boxes, drop-down combo boxes, radio buttons, check boxes, tab controls, tree controls and more. In addition you can put images on dialog boxes, and you can create both modal and modeless dialog boxes. In a modal dialog box, the user must close the dialog before giving focus to another window, while in a modeless dialog box, the user can leave the dialog box open, while continuing to work in other windows. The following dialog, which is displayed when you choose the Backup Database command, is an example of a dialog box created using Xdialog.
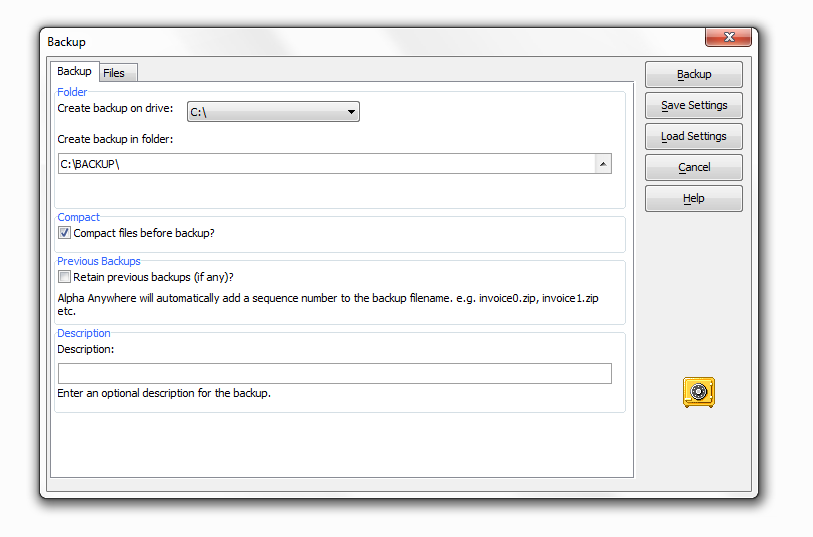
Xdialog will allow you to add dialog boxes to your application that are indistinguishable from dialog boxes that an experienced C or C++ programmer might create. And, it will allow you to do it in a fraction of the time that it would take even the most skilled C programmers!
Using the <;<; Delimiter
The Format parameter in the UI_DLG_BOX() command can be extremely long. It is not practical to enter the dialog Format on a single line between quotes. The <;<; delimiter in an Xbasic script is used when you want to enter a long quoted string over many lines. The syntax of the <;<; delimiter is:
<;<;%code%
text...
text...
text...
%code%
%code% is a tag that indicates the start of the string and the end of the string. The actual text used for the marker is irrelevant. The only requirement is that the marker at the beginning of the string must match the marker at the end of the string. In the above example, the text "code" is used as the marker.
The following Xbasic commands create two CR-LF (carriage return-line feed) delimited strings:
Colors = <;<;%dlg%
Green
Red
Blue
%dlg%
Sizes = <;<;%code%
Small
Medium
Large
%code%
The << delimiter is used in practically every Xdialog script that you will create.
Standard Controls
In this lesson you will learn about the standard Windows controls, such as edit boxes, radio buttons, check boxes, etc. that you can place on your dialog boxes.
Simple Edit Control
Setting the Size of an Edit Control
Check Box Controls
Radio Buttons
Testing a Radio Control's Variable
Freeform Radio Button Controls
Multiple Freeform Radio Button Groups
Combo Boxes
Combo Boxes - Populated from a String
List Boxes
Dialog with Two List Boxes
Multi-Select List Box
Multi-Column List Box
Other Controls
Controlling the Layout of Controls
This lesson discusses the various commands and techniques that you can use to control the layout of your dialog boxes.
Understanding the Grid Nature of a Dialog Box
Address Dialog - No Formatting
Address Dialog - Column Formatting
Address Dialog - Adding Blank Lines
Address Dialog - Spacing of Controls
Address Dialog - Margins
Frames
Frames - Using Regions
Lines
Regions
Horizontal Regions
Sharing Row and Column Dimensions Across Regions
Using the {Col} and {Row} Commands
Advanced Example Using the {Row} and {Col} Commands
Cell Spillover
More on Controlling the Layout of Dialogs
This lesson presents additional commands and techniques that you can use to control the layout of your dialog boxes.
Specifying the Default Button
Setting the Button Width
Setting the Button Height
Setting the Button Hot Key
Conditionally Disabling Controls
Conditionally Showing Controls
Conditionally Replacing Controls
Conditionally Sizing Controls
Setting the Initial Focus
Auto-Selecting Text in a Text Box
Special Formatting for Text Box Controls
Text box controls have a large number of special formatting options that change the behavior and appearance of text box controls. These formatting options are enclosed between '%' characters at the start of the text box.
Text Box Formatting Codes
User Defined Smart Fields
The Code Editor Control
Multi-line and Word-wrapped Text Boxes
Introduction to Dialog Box Events
Up to this point, the dialogs that we have discussed have not included any event processing. An understanding of how to process dialog events is essential if you want to create dialogs that behave in ways that are customized to work just the way you want. For example, using event processing, you could validate data in a control on a dialog, or you could change the value in variables, or arrays that are displayed by the dialog.
What is a Dialog Event?
What is a Dialog Event?
Keeping a Dialog Open after Processing Events
Trapping the OK Button
Trapping the Cancel Button
Trapping the Change Event
Trapping Other Events
Trapping the Double Click Event
Seeing the Name of Events
Using the KillFocus Event
Events and Working with Arrays
Working with Images on Dialogs
Xdialog allows you to place images on dialogs. You can place the images on the dialog background, on a button, next to an element in a list box, and so on. This lesson discusses some of the ways in which you can work with images.
Image Controls
Using Images from External Files
More Dialog Box Controls
This lesson discusses several additional types of controls that you can put on a dialog box.
Check Box-List Box Control
Tabbed List Box Control
Tab Controls
Trapping Tab Control Events
Conditionally Displaying Panes on a Tab Control
Adding Help To a Dialog Box
You can add pop-up help to a dialog box using the {Help} command. The pop-up help is accessed from a standard Windows help file (.hlp or .chm). You need a third party product, such as RoboHelp? to create Windows help files. The pop-up help is displayed when the user presses the F1 key. The pop-up help can also be displayed when the user presses a button on your dialog.
The Help Command
The Record List Control
A record list control displays data in a combo box, edit-combo box, or a list box. Unlike combo boxes or list boxes, however, the record list is populated dynamically with data from records in a table. The advantage of this over a combo box or list box is that there is no limit to the number of entries that can be displayed in a record list. In addition, record lists have other advantages over combo boxes in that they can be multi-columned. If you are familiar with the Table Lookup Field Rule, you can think of the record list control as being loosely equivalent to a table lookup. The record list control gives you a great deal of control over various aspects of the data in the drop-down list or list associated with the record list control. For example, you can control how many columns of data are displayed, column widths, what data is displayed in each column, which records are displayed in the list, and what value is returned when the user makes a selection.
Simple Record Lists
Simple List Box-Record List Control
Advanced Record Lists
Syntax of the KEYLIST_BUILD function
Advanced List Box-Record List Control
Formatting Record Lists
Optimizing Performance of Advanced Record Lists
Record List Events
Working with Pointer Arrays
Pointer arrays (also called "property arrays") allow you to represent "multi-columned" data in an array. For example, for a customer, you have information about the customer's name, address, phone number etc.
Assume that you have the following information about some customers:
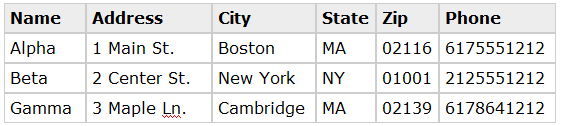
This data can be represented in a pointer array as follows:
DIM customer3 as P
Customer1.name = "Alpha"
Customer1.address = "1 Main St."
Customer1.city = "Boston"
Customer1.state = "MA"
Customer1.zip = "02116"
Customer1.phone = "6175551212"
Customer2.name = "Beta"
Customer2.address = "2 Center St."
Customer2.city = "New York"
Customer2.state = "NY"
Customer2.zip = "01001"
Customer2.phone = "2125551212"
Customer3.name = "Gamma"
Customer3.address = "3 Maple Ln."
Customer3.city = "Cambridge"
Customer3.state = "MA"
Customer3.zip = "02139"
Customer3.phone = "6178641212"
This lesson discusses techniques for using pointer arrays in dialog boxes.
Displaying Data from a Pointer Array in a Dialog Box
Displaying Data from a Table
Displaying Data from a Table - One Record at a Time
Tree Controls
A tree control is a variation of a list box. The tree control is very familiar to all Windows uses as many of the standard Windows user interfaces (such as the Explorer) utilize a tree control. Like a list box, a tree control displays an array of value. In the case of the tree control however, the array of values must be specially formatted to represent the hierarchy of the tree. By default, the period is used to indicate different levels of hierarchy, but any character can be specified. For example, consider an array with the data:
a.1.A
a.1.B
a.2.A
a.2.B
b.1.A
b.1.B
b.2.A
b.2.B
This data represents a tree with two top-level branches ("a" and "b"). The "a" branch has two second level branches ("1" and "2"), The "1" branch has two "leaves" ("A" and "B"), and so on. A list box is converted into a tree control by changing the control directive from "^#" to "^<;". For example, the following script displays the above data in a tree control:
dim data[10] as C
data[1] = "a.1.A"
data[2] = "a.1.B"
data[3] = "a.2.A"
data[4] = "a.2.B"
data[5] = "b.1.A"
data[6] = "b.1.B"
data[7] = "b.2.A"
data[8] = "b.2.B"
result=ui_dlg_box("Simple Tree",<;<;%dlg%
{ysize=2}
[.32,10node^<;data]|

%dlg% )
The above script displays this dialog box. Lesson 12: A Simple Tree Control:
When you double click on a branch, the branch opens to display its children. In the picture below, we have double clicked on the "a" branch, then the "1" branch to display the leaves ("A" and "B").
When you make a selection from a tree control, the variable is set to the full "path" of the current selection. For example, if the user selects "a", then the variable (called "node" in the above script) is set to "a". If the user selects "1", then the variable is set to "a.1". If the user selects "A", then the variable is set to "a.1.A". The following script, which is a simple variation on the above script, demonstrates the point:
dim data[10] as C
data[1] = "a.1.A"
data[2] = "a.1.B"
data[3] = "a.2.A"
data[4] = "a.2.B"
data[5] = "b.1.A"
data[6] = "b.1.B"
data[7] = "b.2.A"
data[8] = "b.2.B"
result=ui_dlg_box("Simple Tree",<;<;%dlg%
{ysize=2}
[.32,10node^<;data] |

 ;
[.32node]
%dlg% )
The above script displays this dialog box, A Simple Tree Control-Showing Return Variable:
As you navigate in the tree, the control below the tree shows the value in the tree control variable.
A Simple Tree Control
A Simple Tree Control - Showing the Return Variable
Adding Navigator Icons to a Tree Control
Adding Images to a Tree Control
Tree Control Events
Advanced Buttons
This lesson covers various ways in which a button can be formatted. Often you will want to put bitmaps on buttons, combine bitmaps and text, and set the text on a button dynamically.
Variable Text on a Button
Putting Bitmaps on Buttons
Working with Images that Contain Multiple Sub-Images
Combining Text and Bitmaps on Buttons
Justifying the Bitmap and Text
Creating Buttons the Easy Way
Dynamically Changing the Bitmap on a Button
Using Owner-Draw Specifications in Controls
As we saw in the previous lesson, the term "owner-draw" refers to the fact that the developer can control certain aspects about the appearance of a button. For example, we saw how owner-draw strings allowed us to put text and a bitmap on a button. Owner-draw strings can also be used with other control types. In the case of list boxes and tree controls, for example, you may want to associate a bitmap with each entry in the control. Alternatively, you may want to transform the way the data in the control is displayed (e.g., swapping the order of two words in each array entry).
A Simple Owner-Draw List Box
Understanding the Owner-Draw Operators
Numbering the Rows in a List Box
Transforming Data in a List Box
Specifying Multiple Images in a List Box
Another Approach to Specifying Multiple Images in a List Box
Specifying the Font of the List Box
Summary of Owner-Draw Commands
Deriving the Font to Use Dynamically
Dynamically Sizing List Box Row Height
Displaying List Box Entries in Color
Dynamic Buttons
Using Embedded Owner-Draw Specifications in Controls
In the previous lesson we showed some techniques for including bitmaps and font information in the data displayed by various Xdialog controls. In this lesson we will show you how you can embed the owner draw directive directly in the data that you are displaying. In many cases this will greatly simplify using fonts and images in your controls.
Displaying Data in Columns
Specifying the Font
Specifying the Font Color
Specifying the Row Background Color
Specifying Images in the Data
Modeless Dialog Boxes
A modeless Xdialog differs from a modal dialog box in that you can leave the dialog box open while continuing to work on other parts of Alpha Anywhere. Up till now, all of the examples in this book have been for modal dialog boxes. Throughout Alpha Anywhere itself, we use modeless Xdialog boxes extensively. For example, the Query Genie, the Find by Key dialog, and the Index Selector are all modeless dialog boxes. The syntax for modeless dialog boxes is virtually identical to the syntax for modal dialog boxes. The only difference is that the command to display a modeless dialog box is:
ui_modeless_dlg_box(title, dialog_body, dialogevent)
In addition, the title and dialog_event parameters are not optional, whereas in the case of a modal dialog, the title parameter can be blank and the dialog_event parameter can be omitted. Following is an example of a very simple modeless Xdialog box.
ui_modeless_dlg_box("Name",<;<;%dlg%
Name: [.20name];
{lf};
;
%dlg%,<;<;%code%
if a_dlg_button = "close" then
   ui_modeless_dlg_close("name")
   end
end if
%code%)
Simple Modeless Xdialog Box
Notice that when you click the X on the title bar, the dialog box does not close. In fact, the only way to close this dialog is to click the "Close" button. When you click this button, the dialog box event handler executes this command:
ui_modeless_dlg_close("name")which closes the modeless dialog box. It is required that you explicitly include code in all modeless Xdialog boxes to close the dialog box. In order to enable users to close an Xdialog box by clicking the "X" on the title bar, you can include the {Can_Exit=event_name} command in the dialog box. For example:
ui_modeless_dlg_box("Name",<;<;%dlg%
{can_exit=close}
Name: [.20name];
{lf};
;
%dlg%,<;<;%code%
if a_dlg_button = "close" then
   ui_modeless_dlg_close("name")
   end
end if
if a_dlg_button = "name" then
   if name <> "" then
       ui_msg_box("Hello","Hello " + name)
   else
       ui_msg_box("Hello","Please type in your name")
   end if
   end
end if
%code%)
This script will display the following dialog box, a Modeless Dialog - Enabling the X to Close:
Simple Modeless Dialog Box
Closing Modeless Dialog Boxes Automatically
Enabling the X Button to Close
Embedded Dialog Boxes
Xdialog allows you to embed one dialog inside another dialog box. This is a very powerful concept because it allows you to create extremely complex dialog boxes using a very modular approach. The Settings dialog in Alpha Anywhere (accessed by selecting View > Settings from the menu) is an example of an Xdialog box that relies on embedded dialog boxes. Explaining how embedded dialog boxes work is easiest by looking at a working example. Consider the following script:
ui_dlg_box("Embedded",<;<;%dlg%
{startup=init}
{embedded=60,15frame1};
{line=1,0};
;
%dlg%,<;<;%code%
if a_dlg_button = "init" then
   ui_modeless_dlg_box("frame1",<;<;%dlg%
   This is an embedded dialog box;
   %dlg%,<;<;%code2%
   1=1
   %code2%)
end if
%code%)
When this script is run, the following dialog box is displayed, a Simple Embedded Dialog Box:
Let's analyze how this script works. Notice the command {embedded=60,15frame1}. This defines the area in which the embedded dialog box will display. An area 60 columns wide and 15 lines high is defined for the embedded dialog. This area is given an arbitrary label called "frame1". Any subsequent modeless dialog box that has a title of "frame1" will be displayed in the area defined for the embedded dialog. Next, notice the command {startup=init}. The {startup=event} command is used to specify an event that should execute as soon as the dialog box is opened. In this case the startup event is called "init" and it executes the following code:
ui_modeless_dlg_box("frame1",<;<;%dlg%
This is an embedded dialog box;
%dlg%,<;<;%code2%
1=1
%code2%)
The code displays a modeless dialog box with the title, "frame1". Because the dialog's title is "frame1" the dialog is displayed inside the parent dialog box. Notice that the event for this dialog box is a meaningless "1=1". as Discussed in the previous lesson, the event parameter is mandatory for a modeless dialog box. Since we do not have the need for a real event processor in this simple script, we just define a dummy event string that does not do much. Notice that the embedded dialog box does not have any explicit code to close the modeless dialog box. That's because this modeless dialog box is used as an embedded dialog box and when the parent dialog box closes, the embedded dialog box also closes automatically. The above example is not really that useful because it is so simple that you would be better off not using an embedded dialog box. However the following example is a much more practical example of how embedded dialog boxes can be used.
Simple Embedded Dialog Box
Creating a Genie Dialog Box
Miscellaneous Examples
"Hot" Labels - Displaying Dynamic Help When Clicking on a Label
"Web" Style Buttons
A Genie Style Dialog that also has Tabs
Adding Right-Click Context Menus
Advanced - Computing the Size of an Embedded Dialog
Advanced - Reading Variables in External Modeless Xdialogs
Anchor Buttons - Advanced Example
Anchor Buttons - Exact Positioning of Buttons
Auto-Advance to Next Control When Current Control is Full
Calling the Generic Find/Replace/Goto Dialog Box
Colored Dynamic Text
Colored Static Text
Controlling Insertion Point and Selected Text in a Text Object
Displaying Data from a Set
Displaying Time Variables
Dynamic Dialog Box Titles
Edit Combo Box with Bubble Help for Choices
Explorer Style Dialog Box
Hanging Indents
ImageViewer Control - Displaying Images on an Xdialog
Linking Modeless Dialogs
MDI Xdialog Framework
MDI Xdialog with ListView Control
Menu Style Buttons
Move to Next Control on ENTER
Multiple Instances of a Modeless Dialog Box
Owner Draw Radio Buttons
Resizable List Box Columns
Rollup Modeless Dialog Boxes
Stretchable Window with Resizable Regions
Tab Stops - Controlling Which Controls Have Tab Stops
Where is the Mouse?
ADO Examples
Using the A5_ADO_TO_ARRAY function
Building Connection Strings
ActiveX Examples
Graphing
XY Graph
Complete List of Supported Chart Types
Complete List of Supported Data Types
Pie Chart
Bar Graph
Interactive Pie Chart
Other
Using the Kodak Image Control
Using the Microsoft Calendar Control
HTML
Responding to JavaScript Events on an HTML Page
HTML Editor Style Xdialog Example
Internet Browser Style Xdialog Example
Creating a User Defined Control
Xdialog, HTML, and JavaScript - a Powerful Combination
Property Sheets
Customer Information Input
Populated from Table
Different Style Sheets